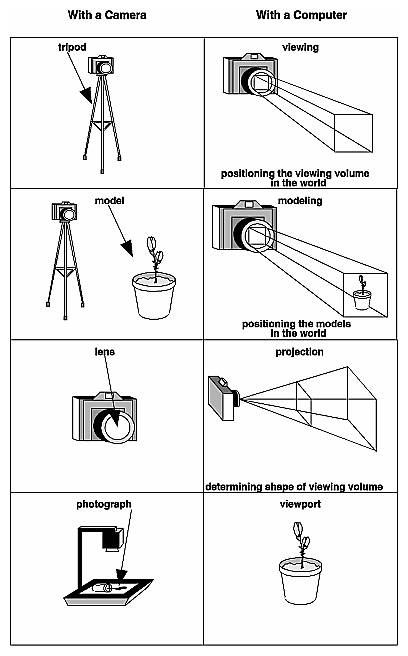
Overview: The Camera AnalogyThe transformation process to produce the desired scene for viewing is analogous to taking a photograph with a camera. As shown in Figure 3-1, the steps with a camera (or a computer) might be the following.
After these steps are performed, the picture can be snapped or the scene can be drawn.
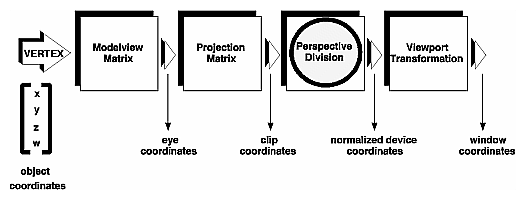
Figure 3-1 : The Camera Analogy Note that these steps correspond to the order in which you specify the desired transformations in your program, not necessarily the order in which the relevant mathematical operations are performed on an object's vertices. The viewing transformations must precede the modeling transformations in your code, but you can specify the projection and viewport transformations at any point before drawing occurs. Figure 3-2 shows the order in which these operations occur on your computer.
Figure 3-2 : Stages of Vertex Transformation To specify viewing, modeling, and projection transformations, you construct a 4 × 4 matrix M, which is then multiplied by the coordinates of each vertex v in the scene to accomplish the transformation v'=Mv (Remember that vertices always have four coordinates (x, y, z, w), though in most cases w is 1 and for two-dimensional data z is 0.) Note that viewing and modeling transformations are automatically applied to surface normal vectors, in addition to vertices. (Normal vectors are used only in eye coordinates.) This ensures that the normal vector's relationship to the vertex data is properly preserved. The viewing and modeling transformations you specify are combined to form the modelview matrix, which is applied to the incoming object coordinates to yield eye coordinates. Next, if you've specified additional clipping planes to remove certain objects from the scene or to provide cutaway views of objects, these clipping planes are applied. After that, OpenGL applies the projection matrix to yield clip coordinates. This transformation defines a viewing volume; objects outside this volume are clipped so that they're not drawn in the final scene. After this point, the perspective division is performed by dividing coordinate values by w, to produce normalized device coordinates. (See Appendix F for more information about the meaning of the w coordinate and how it affects matrix transformations.) Finally, the transformed coordinates are converted to window coordinates by applying the viewport transformation. You can manipulate the dimensions of the viewport to cause the final image to be enlarged, shrunk, or stretched. You might correctly suppose that the x and y coordinates are sufficient to determine which pixels need to be drawn on the screen. However, all the transformations are performed on the z coordinates as well. This way, at the end of this transformation process, the z values correctly reflect the depth of a given vertex (measured in distance away from the screen). One use for this depth value is to eliminate unnecessary drawing. For example, suppose two vertices have the same x and y values but different z values. OpenGL can use this information to determine which surfaces are obscured by other surfaces and can then avoid drawing the hidden surfaces. (See Chapter 10 for more information about this technique, which is called hidden-surface removal.) As you've probably guessed by now, you need to know a few things about matrix mathematics to get the most out of this chapter. If you want to brush up on your knowledge in this area, you might consult a textbook on linear algebra. A Simple Example: Drawing a CubeExample 3-1 draws a cube that's scaled by a modeling transformation (see Figure 3-3). The viewing transformation, gluLookAt(), positions and aims the camera towards where the cube is drawn. A projection transformation and a viewport transformation are also specified. The rest of this section walks you through Example 3-1 and briefly explains the transformation commands it uses. The succeeding sections contain the complete, detailed discussion of all OpenGL's transformation commands.
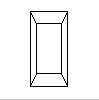
Figure 3-3 : Transformed Cube Example 3-1 : Transformed Cube: cube.c #include <GL/gl.h>
#include <GL/glu.h>
#include <GL/glut.h>
void init(void)
{
glClearColor (0.0, 0.0, 0.0, 0.0);
glShadeModel (GL_FLAT);
}
void display(void)
{
glClear (GL_COLOR_BUFFER_BIT);
glColor3f (1.0, 1.0, 1.0);
glLoadIdentity (); /* clear the matrix */
/* viewing transformation */
gluLookAt (0.0, 0.0, 5.0, 0.0, 0.0, 0.0, 0.0, 1.0, 0.0);
glScalef (1.0, 2.0, 1.0); /* modeling transformation */
glutWireCube (1.0);
glFlush ();
}
void reshape (int w, int h)
{
glViewport (0, 0, (GLsizei) w, (GLsizei) h);
glMatrixMode (GL_PROJECTION);
glLoadIdentity ();
glFrustum (-1.0, 1.0, -1.0, 1.0, 1.5, 20.0);
glMatrixMode (GL_MODELVIEW);
}
int main(int argc, char** argv)
{
glutInit(&argc, argv);
glutInitDisplayMode (GLUT_SINGLE | GLUT_RGB);
glutInitWindowSize (500, 500);
glutInitWindowPosition (100, 100);
glutCreateWindow (argv[0]);
init ();
glutDisplayFunc(display);
glutReshapeFunc(reshape);
glutMainLoop();
return 0;
}
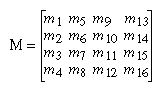
The Viewing TransformationRecall that the viewing transformation is analogous to positioning and aiming a camera. In this code example, before the viewing transformation can be specified, the current matrix is set to the identity matrix with glLoadIdentity(). This step is necessary since most of the transformation commands multiply the current matrix by the specified matrix and then set the result to be the current matrix. If you don't clear the current matrix by loading it with the identity matrix, you continue to combine previous transformation matrices with the new one you supply. In some cases, you do want to perform such combinations, but you also need to clear the matrix sometimes. In Example 3-1, after the matrix is initialized, the viewing transformation is specified with gluLookAt(). The arguments for this command indicate where the camera (or eye position) is placed, where it is aimed, and which way is up. The arguments used here place the camera at (0, 0, 5), aim the camera lens towards (0, 0, 0), and specify the up-vector as (0, 1, 0). The up-vector defines a unique orientation for the camera. If gluLookAt() was not called, the camera has a default position and orientation. By default, the camera is situated at the origin, points down the negative z-axis, and has an up-vector of (0, 1, 0). So in Example 3-1, the overall effect is that gluLookAt() moves the camera 5 units along the z-axis. (See "Viewing and Modeling Transformations" for more information about viewing transformations.) The Modeling TransformationYou use the modeling transformation to position and orient the model. For example, you can rotate, translate, or scale the model - or perform some combination of these operations. In Example 3-1, glScalef() is the modeling transformation that is used. The arguments for this command specify how scaling should occur along the three axes. If all the arguments are 1.0, this command has no effect. In Example 3-1, the cube is drawn twice as large in the y direction. Thus, if one corner of the cube had originally been at (3.0, 3.0, 3.0), that corner would wind up being drawn at (3.0, 6.0, 3.0). The effect of this modeling transformation is to transform the cube so that it isn't a cube but a rectangular box. Try This Change the gluLookAt() call in Example 3-1 to the modeling transformation glTranslatef() with parameters (0.0, 0.0, -5.0). The result should look exactly the same as when you used gluLookAt(). Why are the effects of these two commands similar? Note that instead of moving the camera (with a viewing transformation) so that the cube could be viewed, you could have moved the cube away from the camera (with a modeling transformation). This duality in the nature of viewing and modeling transformations is why you need to think about the effect of both types of transformations simultaneously. It doesn't make sense to try to separate the effects, but sometimes it's easier to think about them one way rather than the other. This is also why modeling and viewing transformations are combined into the modelview matrix before the transformations are applied. (See "Viewing and Modeling Transformations" for more detail on how to think about modeling and viewing transformations and how to specify them to get the result you want.) Also note that the modeling and viewing transformations are included in the display() routine, along with the call that's used to draw the cube, glutWireCube(). This way, display() can be used repeatedly to draw the contents of the window if, for example, the window is moved or uncovered, and you've ensured that each time, the cube is drawn in the desired way, with the appropriate transformations. The potential repeated use of display() underscores the need to load the identity matrix before performing the viewing and modeling transformations, especially when other transformations might be performed between calls to display(). The Projection TransformationSpecifying the projection transformation is like choosing a lens for a camera. You can think of this transformation as determining what the field of view or viewing volume is and therefore what objects are inside it and to some extent how they look. This is equivalent to choosing among wide-angle, normal, and telephoto lenses, for example. With a wide-angle lens, you can include a wider scene in the final photograph than with a telephoto lens, but a telephoto lens allows you to photograph objects as though they're closer to you than they actually are. In computer graphics, you don't have to pay $10,000 for a 2000-millimeter telephoto lens; once you've bought your graphics workstation, all you need to do is use a smaller number for your field of view. In addition to the field-of-view considerations, the projection transformation determines how objects are projected onto the screen, as its name suggests. Two basic types of projections are provided for you by OpenGL, along with several corresponding commands for describing the relevant parameters in different ways. One type is the perspective projection, which matches how you see things in daily life. Perspective makes objects that are farther away appear smaller; for example, it makes railroad tracks appear to converge in the distance. If you're trying to make realistic pictures, you'll want to choose perspective projection, which is specified with the glFrustum() command in this code example. The other type of projection is orthographic, which maps objects directly onto the screen without affecting their relative size. Orthographic projection is used in architectural and computer-aided design applications where the final image needs to reflect the measurements of objects rather than how they might look. Architects create perspective drawings to show how particular buildings or interior spaces look when viewed from various vantage points; the need for orthographic projection arises when blueprint plans or elevations are generated, which are used in the construction of buildings. (See "Projection Transformations" for a discussion of ways to specify both kinds of projection transformations.) Before glFrustum() can be called to set the projection transformation, some preparation needs to happen. As shown in the reshape() routine in Example 3-1, the command called glMatrixMode() is used first, with the argument GL_PROJECTION. This indicates that the current matrix specifies the projection transformation; the following transformation calls then affect the projection matrix. As you can see, a few lines later glMatrixMode() is called again, this time with GL_MODELVIEW as the argument. This indicates that succeeding transformations now affect the modelview matrix instead of the projection matrix. (See "Manipulating the Matrix Stacks" for more information about how to control the projection and modelview matrices.) Note that glLoadIdentity() is used to initialize the current projection matrix so that only the specified projection transformation has an effect. Now glFrustum() can be called, with arguments that define the parameters of the projection transformation. In this example, both the projection transformation and the viewport transformation are contained in the reshape() routine, which is called when the window is first created and whenever the window is moved or reshaped. This makes sense, since both projecting (the width to height aspect ratio of the projection viewing volume) and applying the viewport relate directly to the screen, and specifically to the size or aspect ratio of the window on the screen. Try This Change the glFrustum() call in Example 3-1 to the more commonly used Utility Library routine gluPerspective() with parameters (60.0, 1.0, 1.5, 20.0). Then experiment with different values, especially for fovy and aspect. The Viewport TransformationTogether, the projection transformation and the viewport transformation determine how a scene gets mapped onto the computer screen. The projection transformation specifies the mechanics of how the mapping should occur, and the viewport indicates the shape of the available screen area into which the scene is mapped. Since the viewport specifies the region the image occupies on the computer screen, you can think of the viewport transformation as defining the size and location of the final processed photograph - for example, whether the photograph should be enlarged or shrunk. The arguments to glViewport() describe the origin of the available screen space within the window - (0, 0) in this example - and the width and height of the available screen area, all measured in pixels on the screen. This is why this command needs to be called within reshape() - if the window changes size, the viewport needs to change accordingly. Note that the width and height are specified using the actual width and height of the window; often, you want to specify the viewport this way rather than giving an absolute size. (See "Viewport Transformation" for more information about how to define the viewport.) Drawing the SceneOnce all the necessary transformations have been specified, you can draw the scene (that is, take the photograph). As the scene is drawn, OpenGL transforms each vertex of every object in the scene by the modeling and viewing transformations. Each vertex is then transformed as specified by the projection transformation and clipped if it lies outside the viewing volume described by the projection transformation. Finally, the remaining transformed vertices are divided by w and mapped onto the viewport. General-Purpose Transformation CommandsThis section discusses some OpenGL commands that you might find useful as you specify desired transformations. You've already seen a couple of these commands, glMatrixMode() and glLoadIdentity(). The other two commands described here - glLoadMatrix*() and glMultMatrix*() - allow you to specify any transformation matrix directly and then to multiply the current matrix by that specified matrix. More specific transformation commands - such as gluLookAt() and glScale*() - are described in later sections. As described in the preceding section, you need to state whether you want to modify the modelview or projection matrix before supplying a transformation command. You choose the matrix with glMatrixMode(). When you use nested sets of OpenGL commands that might be called repeatedly, remember to reset the matrix mode correctly. (The glMatrixMode() command can also be used to indicate the texture matrix; texturing is discussed in detail in "The Texture Matrix Stack" in Chapter 9.) void glMatrixMode(GLenum mode); Specifies whether the modelview, projection, or texture matrix will be modified, using the argument GL_MODELVIEW, GL_PROJECTION, or GL_TEXTURE for mode. Subsequent transformation commands affect the specified matrix. Note that only one matrix can be modified at a time. By default, the modelview matrix is the one that's modifiable, and all three matrices contain the identity matrix. You use the glLoadIdentity() command to clear the currently modifiable matrix for future transformation commands, since these commands modify the current matrix. Typically, you always call this command before specifying projection or viewing transformations, but you might also call it before specifying a modeling transformation. void glLoadIdentity(void); Sets the currently modifiable matrix to the 4 × 4 identity matrix. If you want to specify explicitly a particular matrix to be loaded as the current matrix, use glLoadMatrix*(). Similarly, use glMultMatrix*() to multiply the current matrix by the matrix passed in as an argument. The argument for both these commands is a vector of sixteen values (m1, m2, … , m16) that specifies a matrix M as follows:
Remember that you might be able to maximize efficiency by using display lists to store frequently used matrices (and their inverses) rather than recomputing them. (See "Display-List Design Philosophy" in Chapter 7.) (OpenGL implementations often must compute the inverse of the modelview matrix so that normals and clipping planes can be correctly transformed to eye coordinates.) Caution: If you're programming in C and you declare a matrix as m[4][4], then the element m[i][j] is in the ith column and jth row of the OpenGL transformation matrix. This is the reverse of the standard C convention in which m[i][j] is in row i and column j. To avoid confusion, you should declare your matrices as m[16]. void glLoadMatrix{fd}(const TYPE *m); Sets the sixteen values of the current matrix to those specified by m. void glMultMatrix{fd}(const TYPE *m); Multiplies the matrix specified by the sixteen values pointed to by m by the current matrix and stores the result as the current matrix. Note: All matrix multiplication with OpenGL occurs as follows: Suppose the current matrix is C and the matrix specified with glMultMatrix*() or any of the transformation commands is M. After multiplication, the final matrix is always CM. Since matrix multiplication isn't generally commutative, the order makes a difference. |
Програмирование с использованием OpenGL