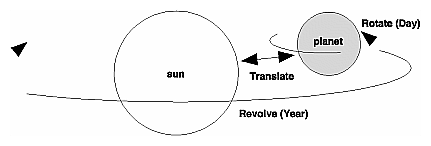
Examples of Composing Several TransformationsThis section demonstrates how to combine several transformations to achieve a particular result. The two examples discussed are a solar system, in which objects need to rotate on their axes as well as in orbit around each other, and a robot arm, which has several joints that effectively transform coordinate systems as they move relative to each other. Building a Solar SystemThe program described in this section draws a simple solar system with a planet and a sun, both using the same sphere-drawing routine. To write this program, you need to use glRotate*() for the revolution of the planet around the sun and for the rotation of the planet around its own axis. You also need glTranslate*() to move the planet out to its orbit, away from the origin of the solar system. Remember that you can specify the desired size of the two spheres by supplying the appropriate arguments for the glutWireSphere() routine. To draw the solar system, you first want to set up a projection and a viewing transformation. For this example, gluPerspective() and gluLookAt() are used. Drawing the sun is straightforward, since it should be located at the origin of the grand, fixed coordinate system, which is where the sphere routine places it. Thus, drawing the sun doesn't require translation; you can use glRotate*() to make the sun rotate about an arbitrary axis. To draw a planet rotating around the sun, as shown in Figure 3-24, requires several modeling transformations. The planet needs to rotate about its own axis once a day. And once a year, the planet completes one revolution around the sun.
Figure 3-24 : Planet and Sun To determine the order of modeling transformations, visualize what happens to the local coordinate system. An initial glRotate*() rotates the local coordinate system that initially coincides with the grand coordinate system. Next, glTranslate*() moves the local coordinate system to a position on the planet's orbit; the distance moved should equal the radius of the orbit. Thus, the initial glRotate*() actually determines where along the orbit the planet is (or what time of year it is). A second glRotate*() rotates the local coordinate system around the local axes, thus determining the time of day for the planet. Once you've issued all these transformation commands, the planet can be drawn. In summary, these are the OpenGL commands to draw the sun and planet; the full program is shown in Example 3-6. glPushMatrix(); glutWireSphere(1.0, 20, 16); /* draw sun */ glRotatef ((GLfloat) year, 0.0, 1.0, 0.0); glTranslatef (2.0, 0.0, 0.0); glRotatef ((GLfloat) day, 0.0, 1.0, 0.0); glutWireSphere(0.2, 10, 8); /* draw smaller planet */ glPopMatrix(); Example 3-6 : Planetary System: planet.c #include <GL/gl.h> #include <GL/glu.h> #include <GL/glut.h> static int year = 0, day = 0; void init(void) {
glClearColor (0.0, 0.0, 0.0, 0.0); glShadeModel (GL_FLAT); } void display(void) {
glClear (GL_COLOR_BUFFER_BIT); glColor3f (1.0, 1.0, 1.0); glPushMatrix(); glutWireSphere(1.0, 20, 16); /* draw sun */ glRotatef ((GLfloat) year, 0.0, 1.0, 0.0); glTranslatef (2.0, 0.0, 0.0); glRotatef ((GLfloat) day, 0.0, 1.0, 0.0); glutWireSphere(0.2, 10, 8); /* draw smaller planet */ glPopMatrix(); glutSwapBuffers(); } void reshape (int w, int h) {
glViewport (0, 0, (GLsizei) w, (GLsizei) h); glMatrixMode (GL_PROJECTION); glLoadIdentity (); gluPerspective(60.0, (GLfloat) w/(GLfloat) h, 1.0, 20.0); glMatrixMode(GL_MODELVIEW); glLoadIdentity(); gluLookAt (0.0, 0.0, 5.0, 0.0, 0.0, 0.0, 0.0, 1.0, 0.0); } void keyboard (unsigned char key, int x, int y) {
switch (key) {
case `d': day = (day + 10) % 360; glutPostRedisplay(); break; case `D': day = (day - 10) % 360; glutPostRedisplay(); break; case `y': year = (year + 5) % 360; glutPostRedisplay(); break; case `Y': year = (year - 5) % 360; glutPostRedisplay(); break; default: break; } } int main(int argc, char** argv) {
glutInit(&argc, argv); glutInitDisplayMode (GLUT_DOUBLE | GLUT_RGB); glutInitWindowSize (500, 500); glutInitWindowPosition (100, 100); glutCreateWindow (argv[0]); init (); glutDisplayFunc(display); glutReshapeFunc(reshape); glutKeyboardFunc(keyboard); glutMainLoop(); return 0; } Try This
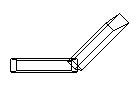
Building an Articulated Robot ArmThis section discusses a program that creates an articulated robot arm with two or more segments. The arm should be connected with pivot points at the shoulder, elbow, or other joints. Figure 3-25 shows a single joint of such an arm.
Figure 3-25 : Robot Arm You can use a scaled cube as a segment of the robot arm, but first you must call the appropriate modeling transformations to orient each segment. Since the origin of the local coordinate system is initially at the center of the cube, you need to move the local coordinate system to one edge of the cube. Otherwise, the cube rotates about its center rather than the pivot point. After you call glTranslate*() to establish the pivot point and glRotate*() to pivot the cube, translate back to the center of the cube. Then the cube is scaled (flattened and widened) before it is drawn. The glPushMatrix() and glPopMatrix() restrict the effect of glScale*(). Here's what your code might look like for this first segment of the arm (the entire program is shown in Example 3-7): glTranslatef (-1.0, 0.0, 0.0); glRotatef ((GLfloat) shoulder, 0.0, 0.0, 1.0); glTranslatef (1.0, 0.0, 0.0); glPushMatrix(); glScalef (2.0, 0.4, 1.0); glutWireCube (1.0); glPopMatrix(); To build a second segment, you need to move the local coordinate system to the next pivot point. Since the coordinate system has previously been rotated, the x-axis is already oriented along the length of the rotated arm. Therefore, translating along the x-axis moves the local coordinate system to the next pivot point. Once it's at that pivot point, you can use the same code to draw the second segment as you used for the first one. This can be continued for an indefinite number of segments (shoulder, elbow, wrist, fingers). glTranslatef (1.0, 0.0, 0.0); glRotatef ((GLfloat) elbow, 0.0, 0.0, 1.0); glTranslatef (1.0, 0.0, 0.0); glPushMatrix(); glScalef (2.0, 0.4, 1.0); glutWireCube (1.0); glPopMatrix(); Example 3-7 : Robot Arm: robot.c #include <GL/gl.h> #include <GL/glu.h> #include <GL/glut.h> static int shoulder = 0, elbow = 0; void init(void) {
glClearColor (0.0, 0.0, 0.0, 0.0); glShadeModel (GL_FLAT); } void display(void) {
glClear (GL_COLOR_BUFFER_BIT); glPushMatrix(); glTranslatef (-1.0, 0.0, 0.0); glRotatef ((GLfloat) shoulder, 0.0, 0.0, 1.0); glTranslatef (1.0, 0.0, 0.0); glPushMatrix(); glScalef (2.0, 0.4, 1.0); glutWireCube (1.0); glPopMatrix(); glTranslatef (1.0, 0.0, 0.0); glRotatef ((GLfloat) elbow, 0.0, 0.0, 1.0); glTranslatef (1.0, 0.0, 0.0); glPushMatrix(); glScalef (2.0, 0.4, 1.0); glutWireCube (1.0); glPopMatrix(); glPopMatrix(); glutSwapBuffers(); } void reshape (int w, int h) {
glViewport (0, 0, (GLsizei) w, (GLsizei) h); glMatrixMode (GL_PROJECTION); glLoadIdentity (); gluPerspective(65.0, (GLfloat) w/(GLfloat) h, 1.0, 20.0); glMatrixMode(GL_MODELVIEW); glLoadIdentity(); glTranslatef (0.0, 0.0, -5.0); } void keyboard (unsigned char key, int x, int y) {
switch (key) {
case `s': /* s key rotates at shoulder */ shoulder = (shoulder + 5) % 360; glutPostRedisplay(); break; case `S': shoulder = (shoulder - 5) % 360; glutPostRedisplay(); break; case `e': /* e key rotates at elbow */ elbow = (elbow + 5) % 360; glutPostRedisplay(); break; case `E': elbow = (elbow - 5) % 360; glutPostRedisplay(); break; default: break; } } int main(int argc, char** argv) {
glutInit(&argc, argv); glutInitDisplayMode (GLUT_DOUBLE | GLUT_RGB); glutInitWindowSize (500, 500); glutInitWindowPosition (100, 100); glutCreateWindow (argv[0]); init (); glutDisplayFunc(display); glutReshapeFunc(reshape); glutKeyboardFunc(keyboard); glutMainLoop(); return 0; } Try This
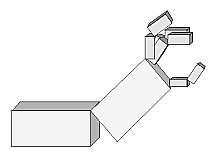
Figure 3-26 : Robot Arm with Fingers |
Програмирование с использованием OpenGL