An Overview and an ExampleThis section gives an overview of the steps necessary to perform texture mapping. It also presents a relatively simple texture-mapping program. Of course, you know that texture mapping can be a very involved process. Steps in Texture MappingTo use texture mapping, you perform these steps.
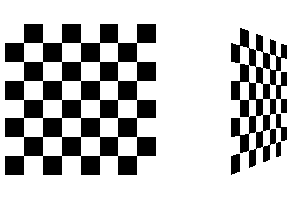
Keep in mind that texture mapping works only in RGBA mode. Texture mapping results in color-index mode are undefined. Create a Texture Object and Specify a Texture for That ObjectA texture is usually thought of as being two-dimensional, like most images, but it can also be one-dimensional. The data describing a texture may consist of one, two, three, or four elements per texel, representing anything from a modulation constant to an (R, G, B, A) quadruple. In Example 9-1, which is very simple, a single texture object is created to maintain a single two-dimensional texture. This example does not find out how much memory is available. Since only one texture is created, there is no attempt to prioritize or otherwise manage a working set of texture objects. Other advanced techniques, such as texture borders or mipmaps, are not used in this simple example. Indicate How the Texture Is to Be Applied to Each PixelYou can choose any of four possible functions for computing the final RGBA value from the fragment color and the texture-image data. One possibility is simply to use the texture color as the final color; this is the decal mode, in which the texture is painted on top of the fragment, just as a decal would be applied. (Example 9-1 uses decal mode.) The replace mode, a variant of the decal mode, is a second method. Another method is to use the texture to modulate, or scale, the fragment's color; this technique is useful for combining the effects of lighting with texturing. Finally, a constant color can be blended with that of the fragment, based on the texture value. Enable Texture MappingYou need to enable texturing before drawing your scene. Texturing is enabled or disabled using glEnable() or glDisable() with the symbolic constant GL_TEXTURE_1D or GL_TEXTURE_2D for one- or two-dimensional texturing, respectively. (If both are enabled, GL_TEXTURE_2D is the one that is used.) Draw the Scene, Supplying Both Texture and Geometric CoordinatesYou need to indicate how the texture should be aligned relative to the fragments to which it's to be applied before it's "glued on." That is, you need to specify both texture coordinates and geometric coordinates as you specify the objects in your scene. For a two-dimensional texture map, for example, the texture coordinates range from 0.0 to 1.0 in both directions, but the coordinates of the items being textured can be anything. For the brick-wall example, if the wall is square and meant to represent one copy of the texture, the code would probably assign texture coordinates (0, 0), (1, 0), (1, 1), and (0, 1) to the four corners of the wall. If the wall is large, you might want to paint several copies of the texture map on it. If you do so, the texture map must be designed so that the bricks on the left edge match up nicely with the bricks on the right edge, and similarly for the bricks on the top and those on the bottom. You must also indicate how texture coordinates outside the range [0.0,1.0] should be treated. Do the textures repeat to cover the object, or are they clamped to a boundary value? A Sample ProgramOne of the problems with showing sample programs to illustrate texture mapping is that interesting textures are large. Typically, textures are read from an image file, since specifying a texture programmatically could take hundreds of lines of code. In Example 9-1, the texture - which consists of alternating white and black squares, like a checkerboard - is generated by the program. The program applies this texture to two squares, which are then rendered in perspective, one of them facing the viewer squarely and the other tilting back at 45 degrees, as shown in Figure 9-2. In object coordinates, both squares are the same size.
Figure 9-2 : Texture-Mapped Squares Example 9-1 : Texture-Mapped Checkerboard: checker.c #include <GL/gl.h>
#include <GL/glu.h>
#include <GL/glut.h>
#include <stdlib.h>
#include <stdio.h>
/* Create checkerboard texture */ #define checkImageWidth 64
#define checkImageHeight 64
static GLubyte checkImage[checkImageHeight][checkImageWidth][4];
static GLuint texName;
void makeCheckImage(void)
{
int i, j, c;
for (i = 0; i < checkImageHeight; i++) {
for (j = 0; j < checkImageWidth; j++) {
c = ((((i&0x8)==0)^((j&0x8))==0))*255;
checkImage[i][j][0] = (GLubyte) c;
checkImage[i][j][1] = (GLubyte) c;
checkImage[i][j][2] = (GLubyte) c;
checkImage[i][j][3] = (GLubyte) 255;
}
}
}
void init(void)
{
glClearColor (0.0, 0.0, 0.0, 0.0);
glShadeModel(GL_FLAT);
glEnable(GL_DEPTH_TEST);
makeCheckImage();
glPixelStorei(GL_UNPACK_ALIGNMENT, 1);
glGenTextures(1, &texName);
glBindTexture(GL_TEXTURE_2D, texName);
glTexParameteri(GL_TEXTURE_2D, GL_TEXTURE_WRAP_S, GL_REPEAT);
glTexParameteri(GL_TEXTURE_2D, GL_TEXTURE_WRAP_T, GL_REPEAT);
glTexParameteri(GL_TEXTURE_2D, GL_TEXTURE_MAG_FILTER,
GL_NEAREST);
glTexParameteri(GL_TEXTURE_2D, GL_TEXTURE_MIN_FILTER,
GL_NEAREST);
glTexImage2D(GL_TEXTURE_2D, 0, GL_RGBA, checkImageWidth,
checkImageHeight, 0, GL_RGBA, GL_UNSIGNED_BYTE,
checkImage);
}
void display(void)
{
glClear(GL_COLOR_BUFFER_BIT | GL_DEPTH_BUFFER_BIT);
glEnable(GL_TEXTURE_2D);
glTexEnvf(GL_TEXTURE_ENV, GL_TEXTURE_ENV_MODE, GL_DECAL);
glBindTexture(GL_TEXTURE_2D, texName);
glBegin(GL_QUADS);
glTexCoord2f(0.0, 0.0); glVertex3f(-2.0, -1.0, 0.0);
glTexCoord2f(0.0, 1.0); glVertex3f(-2.0, 1.0, 0.0);
glTexCoord2f(1.0, 1.0); glVertex3f(0.0, 1.0, 0.0);
glTexCoord2f(1.0, 0.0); glVertex3f(0.0, -1.0, 0.0);
glTexCoord2f(0.0, 0.0); glVertex3f(1.0, -1.0, 0.0);
glTexCoord2f(0.0, 1.0); glVertex3f(1.0, 1.0, 0.0);
glTexCoord2f(1.0, 1.0); glVertex3f(2.41421, 1.0, -1.41421);
glTexCoord2f(1.0, 0.0); glVertex3f(2.41421, -1.0, -1.41421);
glEnd();
glFlush();
glDisable(GL_TEXTURE_2D);
}
void reshape(int w, int h)
{
glViewport(0, 0, (GLsizei) w, (GLsizei) h);
glMatrixMode(GL_PROJECTION);
glLoadIdentity();
gluPerspective(60.0, (GLfloat) w/(GLfloat) h, 1.0, 30.0);
glMatrixMode(GL_MODELVIEW);
glLoadIdentity();
glTranslatef(0.0, 0.0, -3.6);
}
void keyboard (unsigned char key, int x, int y)
{
switch (key) {
case 27:
exit(0);
break;
default:
break;
}
}
int main(int argc, char** argv)
{
glutInit(&argc, argv);
glutInitDisplayMode(GLUT_SINGLE | GLUT_RGB | GLUT_DEPTH);
glutInitWindowSize(250, 250);
glutInitWindowPosition(100, 100);
glutCreateWindow(argv[0]);
init();
glutDisplayFunc(display);
glutReshapeFunc(reshape);
glutKeyboardFunc(keyboard);
glutMainLoop();
return 0;
}
The checkerboard texture is generated in the routine makeCheckImage(), and all the texture-mapping initialization occurs in the routine init(). glGenTextures() and glBindTexture() name and create a texture object for a texture image. (See "Texture Objects.") The single, full-resolution texture map is specified by glTexImage2D(), whose parameters indicate the size of the image, type of the image, location of the image, and other properties of it. (See "Specifying the Texture" for more information about glTexImage2D().) The four calls to glTexParameter*() specify how the texture is to be wrapped and how the colors are to be filtered if there isn't an exact match between pixels in the texture and pixels on the screen. (See "Repeating and Clamping Textures" and "Filtering.") In display(), glEnable() turns on texturing. glTexEnv*() sets the drawing mode to GL_DECAL so that the textured polygons are drawn using the colors from the texture map (rather than taking into account what color the polygons would have been drawn without the texture). Then, two polygons are drawn. Note that texture coordinates are specified along with vertex coordinates. The glTexCoord*() command behaves similarly to the glNormal() command. glTexCoord*() sets the current texture coordinates; any subsequent vertex command has those texture coordinates associated with it until glTexCoord*() is called again. Note: The checkerboard image on the tilted polygon might look wrong when you compile and run it on your machine - for example, it might look like two triangles with different projections of the checkerboard image on them. If so, try setting the parameter GL_PERSPECTIVE_CORRECTION_HINT to GL_NICEST and running the example again. To do this, use glHint(). |
Програмирование с использованием OpenGL